Introduction
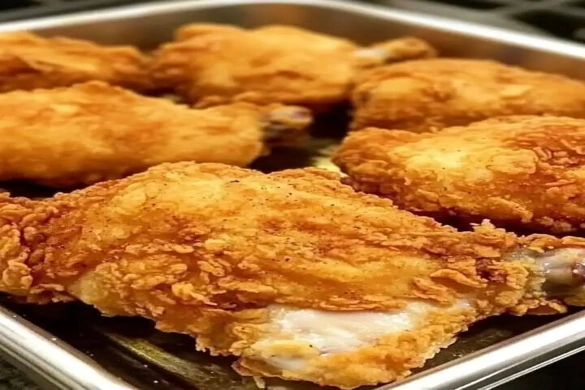
If there’s one dinner that hits every nostalgic note, it’s Baked Fried Chicken—golden, craggy, and wildly crunchy without a deep fryer in sight. The first time I made it for friends, the room went quiet in that great, satisfied way people get when they’re concentrating on a really good bite. Steam lifted off the pan like a little halo, the crust crackled at the touch of a knife, and the meat stayed shockingly juicy. That’s the beauty of Baked Fried Chicken: you get all the texture you crave with a fraction of the oil and zero fryer drama.
This oven method starts with a buttermilk bath for tenderness and tang, then leans on a seasoned flour dredge that turns into a crisp shell. Butter in the pan does a clever stand-in for frying oil, helping the coating bubble and crisp while the oven’s dry heat keeps things light. Flip once halfway through for even browning, and you’ll pull a tray that looks like it came from a roadside chicken shack—only cleaner, easier, and weeknight-friendly.
Serve it with something cool and crunchy like this Easy Creamy Cucumber Salad to balance the richness, and follow with a sunny slice of Lemon Cream Cake if you want a dessert that feels like a little victory lap. Ready to make your kitchen smell amazing? Let’s dive in—along the way I’ll share 7 crispy secrets that guarantee success.
ADVERTISEMENT
Ingredients for the Best No-Bake Cheesecake
For the Chicken
-
6 boneless, skinless chicken breasts, cut into thirds (for even cooking)
-
1 cup buttermilk (tenderizes and adds tang)
For the Coating
-
1 cup all-purpose flour
-
½ teaspoon salt
-
1 tablespoon seasoned salt (such as Lawry’s)
-
¾ teaspoon black pepper
-
2 teaspoons paprika
-
¼ cup unsalted butter (½ stick), for the pan
Crispy Secret #1 – Dry before the dip: Pat the chicken very dry before it meets the buttermilk. Moisture on the surface can thin the coating and block browning.
Crispy Secret #2 – Layered seasoning: Season the buttermilk lightly with a pinch of salt and paprika, and season the flour separately. Flavor in both places = bolder bites.
ADVERTISEMENT
Crispy Secret #3 – Starch matters: If you love extra ridges, swap 2 tablespoons of flour for cornstarch; it heightens shatter and keeps the crust light.
ADVERTISEMENT
Directions to Create Easy Keto Recipes at Home
Below are the standard steps plus keto-friendly swaps so you can adapt Baked Fried Chicken to your goals.
-
Marinate the chicken
Add chicken to a bowl and cover with buttermilk. Chill 20–30 minutes (or up to 4 hours).
Keto swap: Use unsweetened almond milk + 1 tablespoon lemon juice or full-fat Greek yogurt thinned with water instead of buttermilk. -
Preheat & butter the pan
Heat oven to 400°F (200°C). Place the butter in a 9×13-inch baking pan and slide it into the oven for a minute to melt. Swirl to coat the bottom.
Why butter? It mimics shallow frying, crisping the flour while adding rich flavor. -
Mix the coating
In a large zip-top bag or bowl, combine flour, salt, seasoned salt, pepper, and paprika.
Keto swap: Replace flour with a blend of finely ground pork rinds (½ cup) + almond flour (½ cup) and a teaspoon of baking powder for lift. -
Dredge
Lift each piece from the marinade, letting excess drip. Toss in the coating until every side is fully covered.
Crispy Secret #4 – Rest the dredge: Set coated pieces on a rack 5–10 minutes; the flour hydrates and adheres better, so the crust won’t slough off. -
Bake
Arrange chicken in a single layer in the hot, buttered pan, leaving space between pieces. Bake 20 minutes. Flip each piece with tongs and bake 20 minutes more, or until the thickest piece hits 170°F (77°C).
Crispy Secret #5 – Hot pan, hotter air: Preheating the pan jump-starts browning; spacing the pieces lets dry heat circulate and keeps the crust crisp. -
Finish & rest
Let the chicken rest 5 minutes. The steam settles, the coating sets, and juices redistribute.
Crispy Secret #6 – Light mist, big crunch: A quick spritz of neutral cooking spray before baking adds tiny bubbles that turn into extra cragginess. -
Season to serve
Sprinkle with a pinch of seasoned salt or flaky salt the moment it comes out of the oven.
Crispy Secret #7 – Final seasoning counts: A finishing dust wakes up the flavors just like fries from your favorite shop.
Serving ideas: A heap of Homemade Tomato Sauce makes a fun dip for strips, and if you’re craving a playful, shareable appetizer for the same game-day spread, these Garlic Parmesan Cheeseburger Bombs bring serious crowd energy.
Tips & Variations for Healthy Dinner Ideas
-
Air fryer boost: For an even lighter healthy dinner, air-fry at 375°F (190°C) for 14–18 minutes, flipping once. Mist the basket and the chicken lightly with oil.
-
Bone-in option: Use thighs or drumsticks; add 5–10 minutes per side depending on size.
-
Spice profiles:
-
Nashville-ish heat: Add ½–1 teaspoon cayenne and a pinch of brown sugar.
-
Herby ranch: Mix in 1 tablespoon dried ranch seasoning to the flour.
-
Smoky BBQ: Sub smoked paprika for half the paprika and add ½ teaspoon garlic powder.
-
-
Gluten-free: Use a 1:1 gluten-free flour or a cornstarch + rice flour blend (½ + ½ cup) for an ultra-crisp shell.
-
Meal prep: Cook, cool, then reheat on a rack at 375°F (190°C) for 8–10 minutes. The rack keeps bottoms from softening.
-
Turn it into a weeknight bowl: Slice Baked Fried Chicken over shredded cabbage, corn, tomatoes, and a drizzle of yogurt-ranch for a lighter plate.
-
Perfect pairing: A bowl of Basic Vegetable Soup makes a clean, cozy companion to crisp chicken.
FAQ 1 – Can I make Baked Fried Chicken ahead?
Yes. Coat and arrange pieces on a rack, then refrigerate uncovered up to 8 hours. The chill “dries” the dredge for extra crunch. Bake straight from the fridge, adding 2–3 minutes.
FAQ 2 – Why did my crust get soggy?
Likely crowding or a cool pan. Use a preheated, buttered pan; leave space between pieces; rest on a wire rack, not a plate, so steam can escape.
ADVERTISEMENT
Storage
-
Refrigerator: Up to 4 days in an airtight container.
-
Freezer: Freeze cooked pieces on a sheet until solid, then bag for up to 2 months.
-
Reheat: Oven or air fryer at 375°F (190°C) on a rack until hot and re-crisp, 8–12 minutes.
Time & Yield
-
Prep Time: 20–30 minutes (includes marinating)
-
Cook Time: 40 minutes
-
Total Time: ~1 hour 10 minutes
-
Yield: About 18 smaller pieces (from 6 breasts), serves 6–8
Tools Used
-
9×13-inch baking pan
-
Wire rack (helpful for resting)
-
Large bowl or zip-top bag for dredging
-
Tongs
-
Instant-read thermometer
-
Cooking spray (optional but helpful)
Final Thoughts
Baked Fried Chicken proves you don’t need a vat of oil to land that hard-to-resist crunch. A smart marinade, a well-seasoned dredge, and a hot, butter-kissed pan do the heavy lifting, while the oven keeps the process clean and easy. Make a big tray, set it down with a crisp salad, and watch it vanish. For more fun oven ideas, skim Delish’s roundup of baked chicken recipes—it’s packed with fresh flavor paths when you’re in the mood to remix. And if dessert calls, a slice of Lemon Cream Cake is the bright, sweet finish your crunchy dinner deserves.