Introduction
Not Yo Mama’s Banana Pudding—if you grew up in the American South, you can probably taste banana pudding before you even take a bite: the soft vanilla, the cool cream, the wafers turning from crisp to velvety. It turns that memory up to eleven. It’s the no-bake, bring-a-spoon, pass-the-pan dessert that vanishes at potlucks. The first time I made it, I set the chilled pan on the table, reached for plates, and by the time I turned back there were only crumbs and the scent of bananas.
Not Yo Mama’s Banana Pudding is unapologetically creamy: plush instant pudding folded into a cloud of cream cheese, condensed milk, and whipped cream, layered with ripe bananas and vanilla wafers. It’s sweet without being heavy, slices clean for parties, and spoons beautifully for midnight raids.
Best of all, it’s easy. Kids can whisk, someone else can slice, and you can layer. Build it in a trifle dish, a 9×13, or little jars. Chill overnight for travel. When a friend needs comfort, Not Yo Mama’s Banana Pudding is a dessert hug.
ADVERTISEMENT
Ingredients
-
Vanilla pudding mix: 2 packages (3.4 oz each), instant
-
Cold milk: 4 cups (for the pudding; whole milk gives the creamiest result)
-
Cream cheese: 8 oz, softened until perfectly spreadable
-
Sweetened condensed milk: 1 (14 oz) can
-
Whipped topping: 1 (8 oz) container, thawed (or use 3 cups lightly sweetened whipped cream)
-
Vanilla extract: 1 teaspoon
-
Ripe bananas: 5 to 6 medium, sliced into ¼-inch rounds
-
Vanilla wafers: 1 (12 oz) box (plus a few extra for crumbling on top)
Why these work:
Instant pudding sets quickly and stays plush; cream cheese adds body so your Not Yo’ Mama’s Banana Pudding slices clean; condensed milk folds in that signature sweetness; and whipped topping keeps everything light and cloudlike. Vanilla wafers soften at the edges but hold just enough structure to make every spoonful layered and interesting.
Optional but helpful:
ADVERTISEMENT
-
A tablespoon of lemon juice tossed with the banana slices to slow browning
-
A pinch of fine salt whisked into the pudding to sharpen the vanilla
-
Extra whipped cream for swoops on top before serving
Directions for Not Yo Mama’s Banana Pudding
-
Make the pudding. In a large bowl, whisk the vanilla pudding mix with the cold milk for 2–3 minutes, until thick and smooth. Set the bowl in the refrigerator to firm up while you prepare the creamy base. Instant pudding should look like soft mousse rather than runny custard—if it seems loose, give it another minute with the whisk.
-
Whip the creamy base. In another bowl, beat the softened cream cheese with an electric mixer until completely smooth and free of lumps—this step matters for silky texture. Pour in the sweetened condensed milk and continue beating until glossy and combined. Fold in the whipped topping with a spatula until the mixture looks like a billowy cloud. Stir in the vanilla extract.
-
Combine the clouds. Gently fold the chilled pudding into the cream cheese mixture in two additions. You’re aiming for a uniform, fluffy filling with no streaks. Taste a spoonful; if you like a touch more vanilla, add a few extra drops now.
-
Prep the bananas. Slice the bananas into even rounds. If you’re assembling far in advance, toss the slices with a teaspoon or so of lemon juice to slow browning—just enough to coat, not enough to make them taste lemony.
-
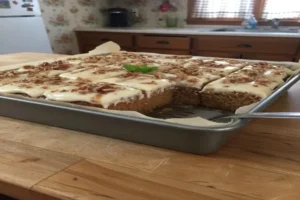
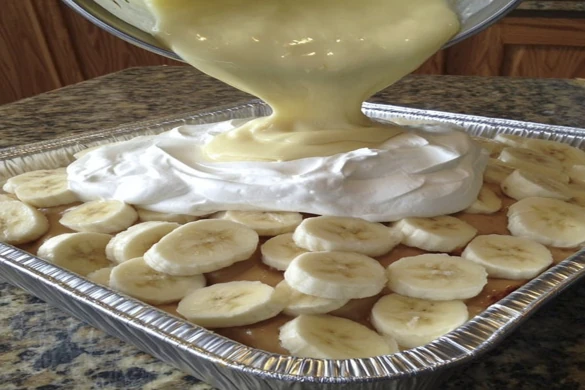
Layer the dessert. Choose your vessel: a trifle dish, a deep 9×13 pan, or eight to ten 12-oz jars. Start with a base layer of vanilla wafers, snug but not crammed. Add a layer of banana slices. Spoon over a thick layer of the creamy pudding mixture, nudging it to the corners so there are no gaps. Repeat the layers—wafers, bananas, cream—until you reach the top, finishing with a generous swoop of cream.
-
Top it off. Crumble a handful of vanilla wafers over the surface for texture. If you love drama, pipe rosettes of whipped cream and tuck in a few whole wafers standing upright.
-
Chill thoroughly. Cover with plastic wrap and refrigerate for at least 4 hours, ideally overnight. This is when the magic happens: the wafers tenderize, the flavors meld, and your Not Yo’ Mama’s Banana Pudding becomes sliceable perfection.
-
Serve cold. Cut clean squares with a long, sharp knife (wipe between cuts) or spoon into bowls. Add a final flourish of whipped cream or a few fresh banana slices right before serving.
Make-ahead note: Because the bananas are enclosed, browning is minimal for a day or two. For events, I assemble the night before and garnish with fresh slices just before serving.
ADVERTISEMENT
Tips & Variations
-
Freshly whipped cream option: Swap the tub of whipped topping for 3 cups of softly whipped heavy cream, lightly sweetened. Fold gently so the mixture stays airy.
-
Chessmen cookie twist: Use buttery shortbread cookies in place of wafers for a bakery-case vibe.
-
Peanut butter swirl: Beat ½ cup creamy peanut butter into the cream cheese mixture, then ripple in an extra ¼ cup warmed peanut butter as you layer. Bananas + PB is a classic for a reason.
-
Chocolate lovers: Add a thin layer of mini chocolate chips between the bananas and cream, or whisk 2 tablespoons of cocoa into one pudding packet and marble it through.
-
Salted caramel finish: Drizzle caramel sauce between layers and a pinched sprinkle of flaky salt on top.
-
Lighter touch: Use reduced-fat cream cheese, light condensed milk, and a “lite” whipped topping. The texture stays surprisingly close to the original.
-
Jar desserts for parties: Layer in eight to ten mason jars; they pack and travel easily, and portion control is built-in.
-
Banana-coconut vacation: Sub 1 cup of the milk with canned coconut milk and sprinkle toasted coconut on top.
-
Make it a dessert bar: Set out bowls of crushed wafers, toasted coconut, chopped nuts, and mini chips. Guests can sprinkle their own topping over a scoop of Not Yo’ Mama’s Banana Pudding.
If you’re building a summer menu, consider a breezy drink like the Strawberry Oreo Cheesecake Frappuccino for a playful pairing—creamy meets creamy, but with a berry-cool finish.
Storage
-
Refrigerator: Cover tightly and chill for up to 4 days. The wafers continue to soften, which many people love; the flavor deepens as it rests.
-
Freezer: Not recommended—the bananas can turn grainy and the cream layer can weep after thawing.
-
Travel tips: Assemble in a disposable 9×13 pan, chill overnight, and keep cold in a cooler. Garnish right before serving for the cleanest look.
Time & Yield: Not Yo Mama’s Banana Pudding
-
Prep Time: 25 minutes (plus chilling)
-
Chill Time: 4 hours to overnight
-
Total Time: about 4 hours 25 minutes
-
Yield: 12–16 servings, depending on portion size
Tools Used
-
Two large mixing bowls
-
Electric hand mixer (or stand mixer)
-
Whisk and rubber spatula
-
Trifle dish, 9×13 pan, or serving jars
-
Plastic wrap for chilling
-
Sharp knife for clean slices
FAQ (2)
Q1: Can I make Not Yo’ Mama’s Banana Pudding a day ahead?
Absolutely—that’s the best move. Assemble the full dessert, cover, and chill overnight. The wafers soften to that perfect cake-like texture, the layers firm up for clean slices, and the flavor blooms. Add any fresh banana slices or extra whipped cream right before serving for the prettiest presentation.
Q2: How do I keep the bananas from browning?
Use ripe (spotty) bananas, slice them last, and tuck them fully inside the cream layers. If you’re assembling more than a day ahead, lightly toss the slices with a teaspoon of lemon juice. The acid slows browning without making the pudding taste lemony.